

thrifty. creative. practical. resourceful. Living Life in Small Town America
Monday, July 3, 2017
Nursery Watercoloring
My family was recently blessed with another sweet little cousin/niece. My sister-in-law opted for a "vintage romantic" theme for the nursery. Here is the watercolor/calligraphy sign I made to adorn her room.
Saturday, July 1, 2017
Headband Holder
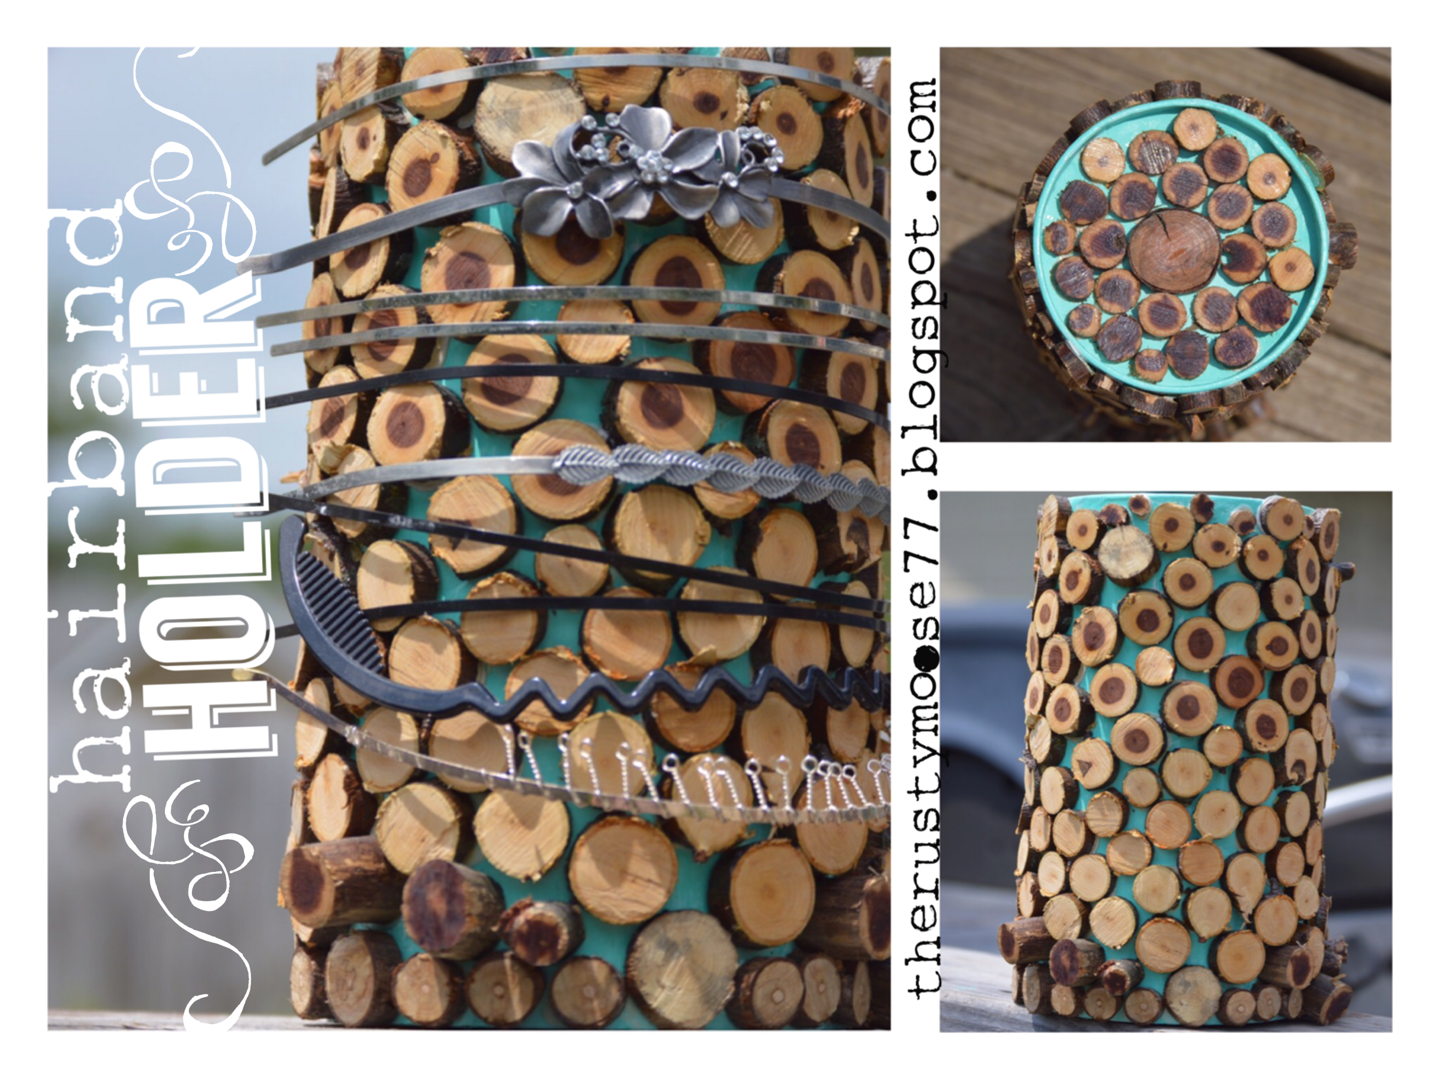 This headband holder is simple & cheap to make. It does take a fair amount of time, but definitely worth it in the end.
Here are the items you will need:


Flip the oatmeal canister upside down and paint all exterior surfaces. While the paint is drying, use a pruning saw to cut branches into "coins" or slices.

I have found that cedar branches have some beautiful coloring, as you can see in the pictures.
Glue the wood coins onto the canister, adding a few at a time, and allowing about 15 minutes for drying in between.

After you have finished covering the convex surface, you can start on the top. Begin by gluing a wood coin in the center. To get your spacing even, view the center as a clock. glue 4 other pieces at 12:00, 3:00, 6:00, and 9:00. When these are dry, fill in the gaps between the previous four. Continue the pattern until you reach the outer border of the canister.

To bring out the character of the wood, coat each coin with clear nail polish. Once the glue has cured (about 24 hours) you can display your headbands on your new headband holder!
Thursday, June 29, 2017
Lake Rock Shoe Rack

Here is a childhood photo circa 1981 (one of the few swimsuit pictures I'll post of myself):

The stones in this area are brilliant colors with interesting patterns. They are usually buffed smooth from glaciers and water.


My relatives usually scoop up a few handfuls of these stones so I can create crafts with them.
In this case, I chose to create a bring-nature-inside style of furniture. To make this project I used several slats of old heavy boards. I cut tree limbs into 4 inch segments to serve as the pillars, and used a screw gun to attach the pieces. Finally came the fun part! I glued the rocks along the edges to create a rugged boarder. I coated each rock with clear nail polish to bring out the color and character. The clear nail polish also makes the rocks appear wet, as though a wave had just crashed over them.


My Little Red Wagon
 What do you do when your kids have outgrown their toddler toys? You upcycle them into gorgeous planters, of course!

Cross Stump
 This beautiful creation is in the yard of one of my friends. As you can see, this once was a stump that had a rotten center. I'm speculating that after the tree was cut down, the rot was cleaned out, leaving only the healthy exterior. Four chunks were cut away, thus forming 2 crosses connected at the arms.
If I may, I would like to go deep with this post. I feel like this stump is a unique symbol of Faith. Sin eats away at our lives, causing deterioration and decay. But if we hold fast Jesus, our faith will always remain and hold steadfast.
"Therefore, if anyone is in Christ, he is a new CREATION. The old has PASSED AWAY, behold, the NEW has come."
2 Corinthians 5:17


Monday, June 26, 2017
Repurposed Planters
 Use old cans, colanders, etc. for charming planters. Simply cover with a fresh coat of spray paint and give old items a second life! Hang your planters from a shepherd's hook or from a fence. It's fun to see how a fresh coat of paint can transform an ordinary object into eye-catching yard decor.
 However, after awhile, rust will start seeping through creating even more character on your planters. Have fun!


Sunday, June 25, 2017
Blue Bottle Tree

What you will need:
•colored bottles (Bud light Premium bottles are recommended)
•square cut lumber pole
•square base (at least 1.5' x 1.5')
•brackets to secure the base to the pole
•20-30 3" screws


Saturday, June 24, 2017
Galvanized Porch Decor
 Sometimes pulling together a simple "country" look is just a matter of visiting the local flea market or auctions or the barn out back. So often, objects that have become obsolete can have charm and be upcycled for a welcoming look. Other times you can purchase cheap items in modern store to finish creating a cozy spot on your porch.
Here are the items shown:
•Welcome sign:
•2 x 4 at local hardware store: $5
•galvanized letters: $1.47/letter at
Walmart
•Wood stain: $5
Planter Buckets: These can easily be found at Walmart for $3 or you can find a sturdier model at an antique store for a few more dollars.

Half Gallon Jar Food Storage
 In our neck of the woods, we have millers (tiny moths) that invade most any dry baking ingredient in the kitchen. They leave behind "cobwebs" in our flour, cornmeal, sugar, rice, etc. it's very aggravating to dump out a whole sack of flour because due to the offspring of these tiny pests. I have found the best solution is screw top lid containers. While this could quickly get expensive, I was able to find gallon canning jars at Wal-mart at $15.97 for a 6-pack. (So it's about $2.67/Jar when you break it down - quite reasonable!)
 Here are the things you will need:


2.) paint each of the lids generously with the black spray paint.


3.) use the paint pen to label each lid.
4.) fill each jar and screw on the lids and you are set!
Friday, June 23, 2017
Vertical Bottle Garden Art

Here are the items you will need:


1.) scrape the labels off the bottles. I have found that running the bottles under hot water makes the adhesive gummy and peels off more easily.

2.) scrape at the corner of the labels with a flat head screwdriver. Once you have a corner started, rip the label off quickly (like a band-aid!) 😊

3.) Glue the bottles end-to-end at the bases. I prefer E6000 glue.

4.) Place along a 90 degree area where the wall meets the counter or floor to assure the the bases are aligned evenly.

5.) When the glue has dried (it takes about 24 hours to cure) place a cork in one end of the bottle necks. This will insure that rain won't get inside. With the absence of water, it will keep the bottle from cracking in freezing weather. It will also prevent mosquitoes laying eggs & mold from growing inside during the summer months.

6.) hammer the garden stakes into the soil and place the open-ended side on the stake. Be sure that the stakes are far enough apart that the bottles won't crash together on a breezy day. Top the remaining stakes with the rest of bottle sculptures. Enjoy the blue light streaming through each morning & evening! They are also beautiful to watch sway on a breezy day!
Subscribe to:
Posts (Atom)